The complete guide to setting up a MODX site
By David Walker (Google profile)
This document aims to help you set up a MODX site on your own server. It started as an internal checklist to make sure clients got sites built with maximum effectiveness and security and minimum waste.
The philosophies underlying this document are simple: exploit MODX to the full, build a system with maximum flexibility to accommodate future changes, and allow the basic framework to be both improved and duplicated.
Before you start
Don't start that FTP client yet! Before you even install MODX - or any content management system - you need to prepare.
Establish site goals and user needs
We're not concerned here about what sort of site you build, but it will help to know what the end game is for the site and how it will be used. Is it to be a personal blog, or a heavily-trafficked photography site with uploads? What is peak demand going to look like? Will people be posting 10 new articles a day? Will you need to deal with 10,000 registered users?
The system's users aren't just from the outside world. Some are the people who will add content to the site over time. How many are there, and how technically proficient are they? This will influence what sort of editing layer you build on top of the freshly-installed MODX manager interface.
Establishing and building towards site goals and user needs is a discipline of its own, called "requirements management". You can spend months on it.
MODX is a great tool for many types of sites, but it has a few weaknesses. They're described at Seven improvements to propel MODX to leadership. Pocket summary: you might want to consider other tools if your site is very simple (e.g. just a few pages), involves publishing thousands of PDFs or other digital files (e.g. an online library), or has complex and industrial-strength e-commerce needs (e.g. an Amazon rival).
For the rest of this document we'll assume that your requirements exercise has established that MODX is an appropriate tool to use on your site.
Establish your environment
You need to decide where you're putting the site. A $9-a-month Dreamhost account may be fine for your personal image gallery; your heavy-traffic opinion site might do better on an Amazon EC2 instance. There are various cases in between. Understand your options and choose the right one.
Create a build book
Create a build book for your CMS and associated systems. This book should answer questions like "what is my CMS username/password/database name?", "why is this bit of the system non-standard?", "where am I keeping the PSDs for these graphics?" and so on. If your build book does its job, you or someone else will be able to use it to re-create your system from scratch in the event that you change webhosts, you get killed in a freak barbecuing accident, or Godzilla eats your server farm.
- It sounds fancy, but a build book is really a lengthy, time-ordered list of reminder notes written to yourself and anyone else who will have to maintain the system.
- Build books are not fundamentally an IT concept. Race-car engineers use them to record how to get an engine back to the way it was before Driver X drove it into the back of another car, etc. Watch this message brought to you by E3 Spark Plugs.
- You should back up your build book securely. You should also keep a printed copy where people can find it in an emergency, but not access it any time they like. The perfect container is thus a lockable glass case on your desk. I'm only partly kidding here.
Take control of your domain
If you're working for a client, they may have already registered a domain. In this case, you'll need to create new A records within the existing DNS records, which are probably maintained by some large provider. These records point the registered domain to your server. (You don't want to take over the business of maintaining DNS records.)
Set up accounts
Make sure that:
- You have usernames and passwords that will let you access your site via FTP and STP and create and access MySQL databases on your web server.
- You have details of an email account that can be used by the installation.
Install an SFTP client
Install a local SFTP client such as FileZilla, ensuring that it is configured for use with SSH rather than plain FTP. Read the documentation and understand how SFTP works.
Alternatives to FileZilla are:
- WinSCP - slow, but featuring PuTTY integration, if that means anything to you.
- Cyberduck - useful for interacting with all sorts of remote file systems as well e.g. Amazon S3 and Google Drive.
Create a Google account
Create a new Google account specifically for running the site, designed to be used primarily by site developers and administrators. You can use this for everything from a Google Analytics account to a Google-driven events calendar to Google Drive.
If you have authors who will be contributing to the site, this is also a good time to check whether they have valid Google author profiles. If not, start the process of setting them up.
Create social media accounts
Check whether social media accounts will need to be integrated with the site, and which ones. Don't presume that someone else is taking care of this. If you want them, start getting them set up now.
- Google Plus
- Delicious
Prepare for e-commerce facilties
If your site will incorporate e-commerce facilities, ensure early on that someone owns the task of setting up a merchant account. A merchant account is not like an application for a credit card, at least in Australia and some other countries. It takes time and is frequently a bottleneck, sometime to the build team's great surprise. Many a site has for weeks sat ready to launch, while a merchant facility application trudges slowly from desk to desk deep inside a bank.
Set up a project backup system
Make sure you have a non-local backup in place for your critical project data. We're not talking here about the data in your CMS, but about all the material that helps generate the final product, including your build book, original texts, and PSD files for your graphics.
Bear in mind that this backup does not need to be a full backup in the technical sense; it can be as simple as keeping your site data in Google Drive. In fact, Google's technology can be the foundation of a useful system. Google keeps multiple versions of all your files and it is way better at backups than you are. You can use Google's excellent Windows and Mac clients or Insync to maintain a local version of critical data which is mirrored on Google's own servers.
If you are building a system for a small private client, set up that Google account for your system, share all the files with your client, and then install Google Drive at their end and ensure they keep all their site-related files in there as well. Hey presto, instant collaboration, (limited) backup and versioning.
If you need access to multiple Google Drives, sign up for InSync.
This system has important limits.
- It won't deal with really big source files used for video or audio.
- It won't deal with large numbers of RAW-format files.
- Its security may not be accepted by some government or large corporate clients.
- It is fundamentally a mirror backup with a 30-day retrieve-from-trash facility, not a full backup. That is, it does not protect against your own mistaken decision to delete files. If you delete all your local files using the local Google Drive client, Google will then faithfully delete them from the server too. The good news is that they will go into Google's "Bin" for 30 days. But after that they're gone.
So you also need a more thorough backup off your data - either a full backup or an incremental or differential backup.
- For a local full backup, try the Syncback program. This program can be set up to backup your local Google Drive data to a network drive.
- Online services including CrashPlan and backupify.com will also provide you with a true backup at another remote location (and backupify.com backs up Google Mail, Contacts and Calendar as well as documents).
- For more on backup strategies, visit Types of Backup.
Database
MODX uses a MySQL database. You probably won’t have a MySQL database with username and password until you create one. To create one, you will normally use your website's administration panel, provided by your web hosting service. You will need to login to your website account and create your MySQL username and password. Remember that whenever you create a database, you need to “assign” the relevant system users to have privileges over that database. You can probably do that from your control panel too.
Installation
Document
As you go, note down as much as possible of what you are doing in your build book.
Install
Download MODX Revolution to your local computer. Then use an SFTP tool such as FileZilla to upload it to your website's document root (often named "public_html" or "www"). The uploading may take a while. Note that the MODX documentation refers to "downloading" as the process that gets the installation files into your website's document root i.e. "downloading" includes what you would probably call "uploading".
- Here are instructions on how to download, how to install or upgrade, and full documentation.
- If you're at all experienced with website setup, consider the "Advanced" install. It's much like the basic install, but it gives you the option to set different paths for your critical core, manager and connectors directories, which are an important step in hardening your site against intruders.
- Watch out for this: Configure your .htaccess file so that both www.yourdomain.com and yourdomain.com work. This should simply be a matter of uncommenting and changing a couple of lines in the installed .htaccess file.
Debug
If something isn't working, it may because your directories are not properly writable. For instance, you may need to set /core/packages to CHMOD 755 rather than 775.
Harden
Harden your installation against security threats. Here are the MODX documentation instructions. Here are YJ Tso's more advanced instructions with lots of detail. Key techniques include:
- Require SFTP to access the server
- Move key MODX directories to locations below the site root and then rerunning the setup, as follows (this is what the advanced install does slightly more simply):
- New path to core: [always change]
- Move the core directory outside your web document root i.e. outside "public_html" or "www".
- Note that the documentation at time of writing did not prompt you to change MODX_PROCESSORS_PATH in config.inc.php – but it does need to be changed.
- Remember to uncheck the box labelled "Check this to DELETE the setup directory from the filesystem" every time you rerun setup, and then manually delete it when you're satisfied everything works. Otherwise you'll have to keep re-uploading the setup folder when you want to run setup again. Unchecking the checkbox is easy to overlook and will require you to re-upload the setup folder. So create a /randomname/ directory on the server root, stash /setup/ in there, and copy /setup/ to the server root whenever you want to rerun itduring the installation. Then delete /randomname/ when you're finished setting up.
- New path to manager: [always change]
- New path to connectors: [not always changed - can cause odd behaviour]
- New path to assets: [generally not changed]
- In System Settings > Sessions and Cookies, change the session cookie path to be the root of the domain (/) rather than the default modx base url (blank).
- Revise the login interface with a new skin to disguise the fact that the site uses MODX :
- Custom skin path: [mydomain.com/changed_manager_name/templates/my_skin]
- New manager_theme value: [my_skin]
Upgrading after hardening
As the MODX documentation says, hardening "will make your site more secure, but updating your site will become more complex: you will have to merge the various component directories one at a time for each MODX update".
Set system settings
Make sure to check the settings in the "core -> site" area. These include settings such as the name of your site.
Within the system settings you can turn the "Site status" to "no" while you are building the site, and set a temporary message. This will essentially cloak your site while you work on it.
Any MODX site will need to send some email, even if just a "forgotten password" email to you when you misplace your password. So ensure you set this up correctly. Set the email addresses that appears in "Authentication and Security - Registration E-mail From Address",
If you do not access to an SMTP server using the same domain name as the site, you can use a Gmail address. See Gmail configuration instructions on the MODX Forums.
Turn on FURLs
These are Friendly URLs that give your pages proper names rather than titles like index.php?id=245. See the MODX FURLs documentation. Go to System -> System Settings to turn on FURLs and to set "Automatically generate alias" to "Yes".
Test
- Create a test page with a basic template and test and correct until it works.
- Turn the site status to "yes" for a few minutes and test the site at Pingdom Tools in order to establish a performance baseline.
- While you're at the Pingdom site, do a DNS check.
Create a site backup system
I wrote above about a project backup system to back-up all the files associated with the site. Now we are talking about the site itself - which, for MODX, means the files and database that make up the content management system. You do want to make this backup, and you want to do it now, before you start building and breaking things.
MODX sites can be backed up in two ways:
1 - Manual backup of files and database
See Susan Ottwell's MODX upgrade instructions (PDF), which include backup instructions. This requires you to be able to SSH to your installation - which, for beginners, is not as hard as it sounds.
2 - Use Vapor
Vapor is a MODX system for downloading a version of your site for upload to another MODX install. It was designed for use with the MODX Cloud system, but also works on some standalone installations. See Susan Ottwell's Vapor instructions (PDF). Simple steps:
- Install Vapor on the source site as a package using the Vapor.zip file
- Use Vapor to create transport package at source site
- Install MODX on the target server
- Put exported transport package ZIP file in core/packages on the target site.
- Install to new site through MODX Package Management.
Note that this does not work on all installations. I have had no success moving hardened installations.
Add capability
A note on resources and elements
One of the aims of this document is to help you create sites that can be easily exported. To do this, I recommend you keep all the resources you create in and elements you create in directories separate from those that contain pages related to add-ons. Similarly, put elements you create into an identifiable category (mine is called "System") and various sub-categories. If you're exporting this material later (for instance, using the MyComponent add-on) you'll be glad you kept everything separate.
Add-ons that you install will generally put their material into their own categories and sometimes their own directories.
With that out of the way ...
Install the first add-ons
This can be done anytime, but a few add-ons are useful pretty early:
- The first add-ons you should install are the ones that will help you get work done:
- Permissions management: If you will have multiple users with different levels of access, your first install should be the DefaultResourceGroup plug-in. This is a complicated place to start but if you are planning sophisticated user management you need it. Details are in Bob Ray's tutorial.
- Here's the twist: rather than setting DefaultResourceGroup up as Bob Ray says, I suggest you disable the plug-in, duplicate it, rename it (as ParentResourceGroup) and modify the duplicate as described by hochmohr in the MODX forums to create a plug-in which adds new resources to the same resource groups as their parents. (This won't need any resource group specified for the plug-in, either.)
- Site configuration: ClientConfig lets you create a set of site-wide variables that your users can change without having access to the elements tab of the manager.
- Rich text editing: the TinyMCE editing interface will help anyone who wants a Word-like interface for writing content. Can be turned off page-by-page. I suggest you turn on extended_valid_elements.
- Code highlighting: CodeMirror provides custom syntax highlighting and search/replace in your MODX elements, to make editing much easier inside the MODX interface.
- Versioning: Use Mark Hamstra's admirable VersionX, which will quietly make a copy of your individual elements and resources every time you save them.
- Package creation. Many site ingredients - snippets, chunks, templates, files, even entire packages - can be exported from an existing site using the PackMan extra. Sadly, PackMan doesn't preserve your categories; you'll have to recreate them. The better alternative, though slightly more complicated, is to use Bob Ray's MyComponent plug-in to export large parts of a site to another site.
- Then install Articles. A content management system can display items in a content collection in either of two ways - a hierarchy (tree view) and a time-ordered stream (journal view). MODX comes with a tree view on the left-hand side of the dashboard; Articles adds a journal view. If you might eventually have a large number of time-ordered blog posts/news items/whatever, you need Articles. It's also a recommended install because it in turn installs a bunch of add-ons that are useful not just for anyone publishing a blog or news site, but in many other situations too:
- getResources - For listing posts, pages and other Resources.
- getPage - For pagination of listings.
- Quip - For anything and everything in commenting.
- tagLister - For managing tags and doing tag-based navigation.
- Archivist - For managing your Archives section.
- getFeed - If you want to grab other feeds in your site, such as a Twitter feed.
You can use any existing template for your Articles.
Note that if you use the Longtitle field in your template, you will have to go into the Modx system settings and change "Show Long Title Field" to "Yes". It's set to "No" by default.
- FormIt will give you configurable forms, such as a contact form.
Install Typekit
Typekit is the most widely-used tool for bringing custom typefaces to your site. It's very simply to integrate into MODX templates.
Load up templates, basic chunks, stylesheets and images
These are the framework for your site.
- You can use Twitter Bootstrap or ZURB Foundation as a starting template, or any other design you choose. (Remember, MODX is not like WordPress and other CMSs which require templating packages so complex that people sell them commercially. In MODX, any valid HTML document can be the basis of a template.)
- Load up your stylesheets as MODX resources (no template, content type CSS). You can use Twitter Bootstrap or ZURB Foundation CSS.
- FTP scripts to their appropriate directories. There's little point in putting many scripts as resources - just add them to the filesystem.
- Your key initial images are a logo, favicon and iPhone and Android icons.
Tip for layout: You can use a package of basic MODX chunks to set site-wide basics and control styling - colours, fonts, sizes and so on - within your CSS. If you do this as you go, you will give yourself enormous flexibility to change your site's layout later on. This site you are on now uses a package of basic MODX chunks and a Bootstrap-based template which pulls them together, together with a Reference Guide to remind us what's what.
Tip for multiple site builders: Once you have created a set of chunks that you use consistently, you can copy them from site to site using the MyComponent add-on.
Install packages for key functions
The key ones are:
- Search: To start with, just install SimpleSearch and have a search facility happening in 60 seconds, This is the sort of result that creates MODX enthusiasts. Once you've created your pages, you can customise the search function in dozens of ways.
- Menu creation:
- Use Wayfinder for multi-level menus. Make sure you understand how to use this cached, since uncached Wayfinder calls in your pages are a great way to cruel page load times.
- Use BreadCrumb for, well, breadcrumb-style navigation.
- Note on importing: Breadcrumb uses property sets to define which templates are used. If you are importing a site, you will need to import its Breadcrumb property set separately.
- The similarly-named BreadCrumbs is a different package and a little harder to use, though with its own strengths.
Tip for adding packages: Many packages use chunks to dictate layout and other options. Wherever possible, use a package's system settings to change these layouts and other options. Point the settings to new chunks or other elements containing your customisations, rather than overwriting the existing chunks. Why? Because when the package is upgraded, your changes to existing chunks and other elements will be overwritten. Your revised settings and new elements will not be.
Install user management
In some cases you will want to identify and manage users. The most common cases are when you need to give users the ability to:
- Sign up to a newsletter and manage their preferences.
- Gain access to a members-only area of the site.
- Record their personal details for future transactions.
User self-management with Login
For any of these purposes, you will need to first install the Login add-on. Login is among the best-known and most carefully tested of the MODX add-ons, and it makes use of MODX's robust user management and security features.
Newsletter sign-up with Subscribe and EmailResource
You can use MODX as a full-blown email newsletter publishing system by using Bob Ray's Subscribe and EmailResource add-ons.
- Email publishing: EmailResource helps you send email alerts, digests and full-blown newsletters direct from MODX using the content you already have.
- Subscription management: Subscribe lets users subscribe and unsubscribe easily, and is fully integrated with MODX's user management system. Note that during install the Subscribe snippet will look for a login page called "login" - so install the Login add-on first.
If you're running a publishing site, these two make MODX a pretty attractive option.
Reporting
Now's the right time to add all the stuff that will let you know how your website is performing:
- Google Analytics
- Set up your Google Analytics account. This should be done using the same account username that you used to set up the other Google facilities above.
- Register your domain with Google at google.com/accounts/ManageDomains. Enter your domain name and click the Manage yourdomain.com link at the bottom of the page. Verify that you own the domain, for instance by adding a meta tag to your site. Click the radio button for the meta tag option and you’ll see the meta tag you need to load to your site.
- Put your Google Analytics code in a chunk and wrap it with Mark Hamstra's isAdmin snippet to remove admin user stats from Google Analytics.
- Google Content Experiments
- Google Webmaster Tools
- Google site map
- Crazy Egg page heat map
- Monitor.us monitoring tools
- RBLmon email black hole monitoring
- Pingdom uptime reporting
Optimise for performance as you go
Test as you go. You can test your page loading speed at Pingdom tools, and I recommend you do. Its waterfall charts will help you identify where you're pages are being held up, and it keeps a nice history of your load times and overall "performance score". You might also take a look at GTMetrix, which shows you both Google’s and Yahoo’s page speed tools.
Four things pretty much determine the effectiveness of your optimisation:
- Front-end code. Most of us overestimate the problems that originate in the backend (MODX database queries etc) and underestimate the effect of problems in the front-end (HTML coding issues, image optimisation etc). Reducing the number of files you serve is vital. Read Yahoo's optimisation guide and take a look at Steve Souders' site.
- Appropriate image compression. If you can take 130kB JPEGs and make them 45kB, yours site will likely serve faster – though maybe not that much faster for most people, since the number of files frequently matters more than their size.
- Server configuration. Understand how the underlying server is compressing and caching files and setting files headers and how to change it. This is tricky.
- MODX caching and code efficiency. Use the MODX cache for everything you can except for user-specific output, and content related to URL parameters or POST data. Read Mark Hamstra's tutorial and this opengeek comment on the MODX Forums. Short version: running too much uncached code will kill performance.
Also read this forum thread based on a Gauke Pieter Sietzema speech at 2012 MODXpo and the forum thread Give MODX some speed!
One of MODX's great advantages is its capacity for fine control of caching. Caching is essentially a technique for speeding up your site by replacing MODX's own database-generated responses with pre-written files. MODX caches files by default, the first time they're requested, and it clears the cache when you save changes you've made. But you can also turn caching off at various points in the assembly of a page.
Just a caution: MODX comes out of the box pretty efficient. In many cases, the only two things that will really raise the performance of stock MODX are server content compression, and the number of files you load. Both of those are independent of MODX.
Quick optimisation
- Like I said, if you do nothing else, enable content compression. Check whether your host sets their servers for compression or allows you to turn compression on. It's a huge bonus if they do. (You can check your server at whatsmyip.org.) On cPanel setups, this option is in the "Software and Services" section under the link labelled "Optimize Website". It allows you to list MIME types for which GZIP compression will be turned on, or just turn compression on for everything, using Apache's mod_deflate. Never mind the details – you almost certainly want GZIP compression. It can give you a 75 per cent reduction in the size of hulking 100kB+ CSS files.
- Alternatively, you can enable website compression using the .htaccess gzip/deflate option. See the .htaccess example below.
- Concatenate your CSS and Javascripts into just two files by putting them in MODX and using getResources. This minimises HTTP requests and allows the browser to download other files (browsers can only download so many files at once). Not all scripts can be concatenated, but work at it.
- Maximise caching, compression and other factors within your .htaccess file. This is not a MODX setting but a general server tuning technique.
- For server configuration via a .htaccess file, see AskApache and Samuel Santos's site.
- One opportunity here is to set expiry dates in the far future using Apache's mod_expires or whatever your server uses instead. However, note that when you use mod_expires, you commit to a fundamental change in the way you interact with your site. That cached logo will now stay in the cache for 10 years, regardless of whether you replace it with the new logo next week. So you now need to rename your files whenever they change. Essentially, you need to give them revision numbers - for instance, myImage.1.3.gif. This can be a serious pain whenever you need to revise a GIF. One solution is to put in chunks the names of any files that might change. Then reference the chunks - and when a filename does change, just change the content of the chunk, once. An alternative may be Kevin Hale's solution.
- If you're measuring your performance using Google and Yahoo tools, fine-tuning via .htaccess will get you extra points.
- For a general understanding of server caching, the go-to expert back in the 1990s was Mark Nottingham, a good Melbourne lad. Turns out he's still the guy for caching.
- Put Javascripts at the bottom of the page rather than the top wherever possible - that is, wherever you don't need code until after the page onload event.
- Experiment with caching beyond .htaccess. Various recommended techniques and extras may or may not not make much difference in your environment. Techniques you should explore include:
- Ad-hoc caching: If data (in a snippet) changes before the cache has been cleared - for example, if data is retrieved from an external RSS feed - you will want to use a custom caching method such as the getCache snippet.
- Regular re-cacheing: If your server supports Cron you can use the RegenCache script by Jason Coward to crawl the site and cache all cacheable resources every so often.
- More caching options: This JP Devries tutorial looks at getCache, xFPC and statcache.
- Checking Wayfinder: This is a major bottleneck when called uncached, and rarely needs caching. In fact, it has a parameter that allows you to cache results for as long as you like. Use this.
- Try optimising Javascript and CSS files using MODX's MinifyX or SmartOptimizer. Neither extra did anything obvious for me, though.
- Crunch your images. Two tools to try are:
- FastStone Photo Resizer 3.1 - Windows freeware that you download and run on single or multiple images; it has powerful image manipulation features as well.
- Kraken - Powerful online tool which is particularly effective with PNGs.
- Evaluate your MODX code by wrapping snippet calls in Executioner.
These notes borrow from Google's Web Performance Best Practices and Steve Souders' 14 rules. You can also buy Souders' book, High Performance Web Sites.
Content distribution networks
A final technique is to use a content distribution network to effectively move your content closer to your users. I'm still experimenting with CDNs and don't have a view about how important they are to optimisation. Early signs are mixed. In theory a CDN should be a good way to take advantage of cheap and high-quality US hosting while serving up fast delivery to audiences outside the US.
Example .htaccess file for Apache
My example MODX .htaccess file (your needs, and your server set-up, may vary):
# ---------- FRIENDLY URLS AND REWRITING ----------
# MODX supports Friendly URLs via this .htaccess file. You must serve web
# pages via Apache with mod_rewrite to use this functionality, and you must
# change the file name from ht.access to .htaccess.
#
# Make sure RewriteBase points to the directory where you installed MODX.
# E.g., "/modx" if your installation is in a "modx" subdirectory.
#
# You may choose to make your URLs non-case-sensitive by adding a NC directive
# to your rule: RewriteRule ^(.*)$ index.php?q=$1 [L,QSA,NC]

RewriteEngine On
RewriteBase /

# Rewrite www.domain.com -> domain.com -- used with SEO Strict URLs plugin
RewriteCond %{HTTP_HOST} .
RewriteCond %{HTTP_HOST} !^example-domain-please-change\.com [NC]
RewriteRule (.*) http://example-domain-please-change.com/$1 [R=301,L]
#
# or for the opposite domain.com -> www.domain.com use the following
# DO NOT USE BOTH
#
#RewriteCond %{HTTP_HOST} .
#RewriteCond %{HTTP_HOST} !^www\.example-domain-please-change\.com [NC]
#RewriteRule (.*) http://www.example-domain-please-change.com/$1 [R=301,L]

# Rewrite secure requests properly to prevent SSL cert warnings, e.g. prevent
# https://www.domain.com when your cert only allows https://secure.domain.com
#RewriteCond %{SERVER_PORT} !^443
#RewriteRule (.*) https://example-domain-please-change.com/$1 [R=301,L]

# The Friendly URLs part
RewriteCond %{REQUEST_FILENAME} !-f
RewriteCond %{REQUEST_FILENAME} !-d
RewriteRule ^(.*)$ index.php?q=$1 [L,QSA]

# ----------- SECURITY ----------------

# Hide the server version from prowlers

 ServerSignature Off

# Close register_globals security hole - not needed here as register_globals is OFF on this server

#php_flag register_globals Off

# ----------- MIME TYPES -------------
# Make sure files are served with the proper MIME type


 AddType application/vnd.ms-fontobject .eot
 AddType application/x-font-ttf .ttf
 AddType application/x-font-opentype .otf
 AddType application/x-font-woff .woff
 AddType image/svg+xml .svg
 AddType text/x-component .htc


# ----------- COMPRESSION ----------------

# Not needed on these servers as gzip compression is enabled on all files at the server level.

# For PHP-enabled servers that support output compression but do not have it set, you may pick up a bit of
# speed by un-commenting the following two lines to turn on PHP's zlib output compression.

# Gzip - Apache compression for all files.
#
# AddOutputFilterByType DEFLATE text/text text/html text/plain text/xml text/css application/x-javascript application/javascript text/javascript x-font/otf x-font/ttf x-font/eot image/svg+xml
#
# End Gzip

# For PHP-enabled servers that support output compression but do not have it set, you may pick up a bit of
# speed by un-commenting the following two lines to turn on PHP's zlib output compression.
# But try mod_deflate as above first - PHP compression will be slower than Apache and only on PHP files.

#
# php_flag zlib.output_compression On
# php_value zlib.output_compression_level 5
#

# ----------- ETAG REMOVAL ----------------

# If you don't want ETags (see developer.yahoo.com/performance/rules.html#etags)
# Note that FileETag None is not enough for every server.

#FileETag None
#
#  Header unset ETag
#

# ----------- CACHING ----------------
# DISABLE CACHING UNTIL YOU ARE READY TO PUT THE SITE LIVE

# Let server know that content served for this url will vary according to the value of a certain request header

#
#  <FilesMatch "\.(js|css|xml|gz)$">
#   Header append Vary: Accept-Encoding
#
#

# Define the value of the Expires header and the max-age directive of the Cache-Control header to one month from now
# Scripts, xml expire after 17,200 seconds = 4.8 hours. Turned off for the moment to let MODX manage caching.
# Media binaries expire after 2592000 seconds = 1 month. Change to 604800 if you want a week instead
# Change name or path if you want to change within that time


 ExpiresActive On
# ExpiresByType text/xml A17200
# ExpiresByType text/javascript A17200
# ExpiresByType text/css A17200
# ExpiresByType application/xml A17200
# ExpiresByType application/json A17200
# ExpiresByType application/rss+xml A17200
# ExpiresByType application/javascript A17200
# ExpiresByType application/x-javascript A17200
 ExpiresByType image/gif A2592000
 ExpiresByType image/jpeg A2592000
 ExpiresByType image/jpg A2592000
 ExpiresByType image/png A2592000
 ExpiresByType image/svg+xml A2592000
 ExpiresByType image/x-icon A2592000
 ExpiresByType video/ogg A2592000
 ExpiresByType audio/ogg A2592000
 ExpiresByType video/mp4 A2592000
 ExpiresByType video/webm A2592000
 ExpiresByType font/truetype A2592000
 ExpiresByType font/opentype A2592000
 ExpiresByType font/woff A2592000
 ExpiresByType application/javascript A2592000
 ExpiresByType application/x-javascript A2592000
 ExpiresByType text/javascript A2592000
 ExpiresByType text/css A2592000
 ExpiresByType application/vnd.ms-fontobject A2592000
 ExpiresByType application/x-font-ttf A2592000
 ExpiresByType application/x-font-opentype A2592000
 ExpiresByType application/x-font-woff A2592000


BrowserMatch "MSIE" brokenvary=1
BrowserMatch "Mozilla/4.[0-9]{2}" brokenvary=1
BrowserMatch "Opera" !brokenvary
SetEnvIf brokenvary 1 force-no-vary
Create your users
Other people will probably need to create and edit content in the website. This will force you to grapple with MODX Revolution security permissions.
The MODX way of doing security is conceptually elegant and powerful. In practice it's also seriously confusing for many users, and has forced some users to resort to unsatisfactory strategies like making everyone an administrator.
At time of writing, the MODX team is working on ways to make permissions simpler. That underlying conceptual elegance means they're likely to eventually come up with a good solution. But they haven't done so yet - and since you're reading this, you probably need to build a site right about now. So ...
The best step-by step approaches to dealing with MODX security right now are set out in the forums, by other users who have grappled with the problem, and by the prolific Bob Ray:
- Bob Ray's Revolution Permissions tutorial and associated material
- jusmeig's 13 steps to create an editor user
- webdesig's seven-step plan with a friendly narrative style.
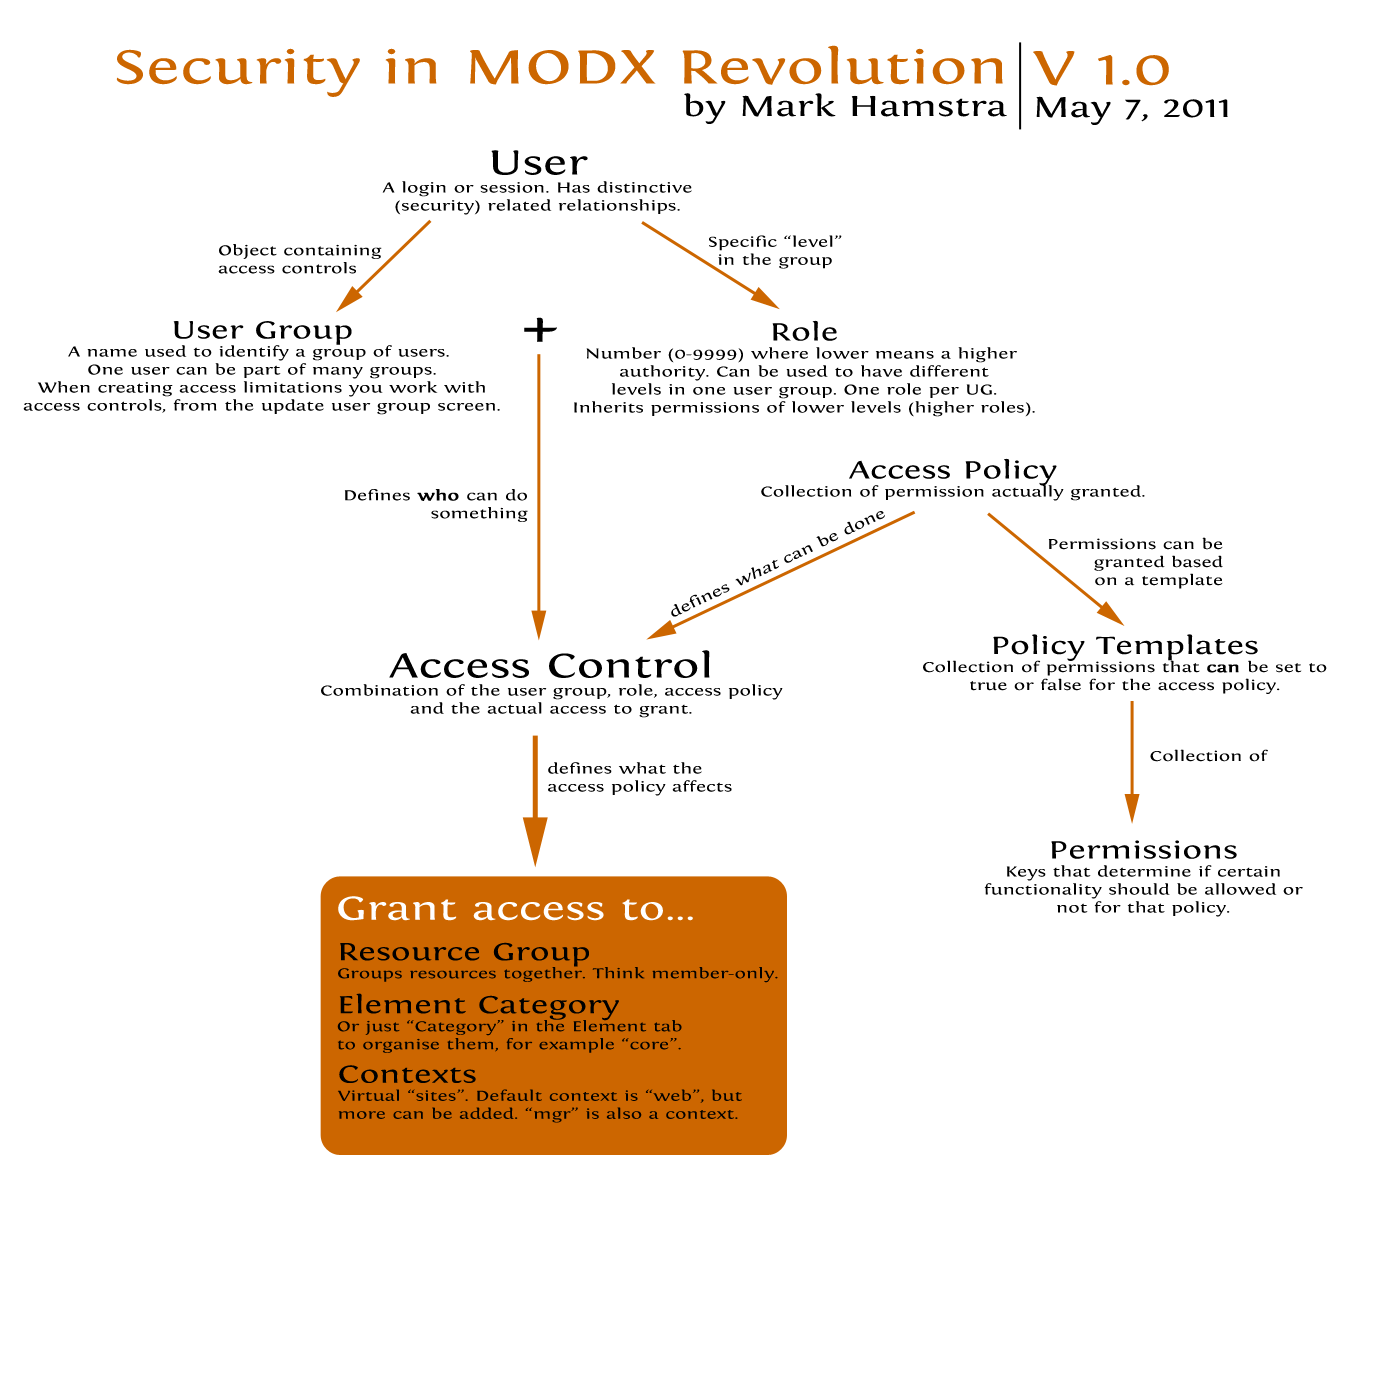
- Mark Hamstra's security diagram for more advanced users, which might either help you or confuse you more.
How to get your head around MODX security
The toughest thing about MODX security is getting your head around the concepts behind it. When you understand them, they do make sense. The two problems are that they're often not obvious, and there are just too many of them. But if you understand the problem's they're addressing, you may find them a little more accessible.
Here's my quick take, which owes quite a lot to Bob Ray.
MODX security is built on three things:
- Resources - database records that generate web pages or groups of web pages.
- Users - people who interact with those resources. Users are either ordinary nameless people browsing your site - the "anonymous user" - or they're named individuals with some sort of permission to do things.
- Contexts - ways in which people interact with the site. Most of the time there are just two:
- "web" - the ordinary website, which all the nameless visitors can see; and
- "mgr" - the manager interface, where the named individuals who control the website make things happen.
So users interact with resources in different contexts.
If you want an analogy, think about the soft drink dispensers you see in corridors and shops. To extract cans from the dispenser, you interact with it via the easily-accessible context of the coin slot and the can dispenser slot. Anyone can use those, just as anyone can look at a website. But the stocker has a key that opens up the machine, and she can add or remove cans in bulk, directly - a different context for that user to interact with the machine's resources.
By default, all resources are available to all users in the "web" context. That's a sensible default.
But when users are given access to resources, that rule is flipped. Now these resources are protected. And MODX declares that now, by default, users can't see them. It's as if the stocker had to be given specific access to each can in the dispenser.
You will want these protected resources to be visible to some users - the right users, users who have logged in with a proper username and password and who you've said can see those resources and perhaps edit them if they're accessing them in the manager. To make that happen, you have to link up - "associate", in MODX parlance - the users with the resources.
That could be slow. If you had 10 people with permission to use the manager, and your site had 1000 pages, that would be 6000 sets of permissions you'd need to set up. Madness. You need a shortcut.
MODX has a shortcut. The shortcut is to bundle the users and resources up in user groups and resource groups. Instead of associating users with resources, we put users into user groups and resources into resource groups and then associate the user groups with the resource groups. The same thing happens as when a single resource gets associated with a single user, but in bulk - all the resources in the resource group that's associated with a user group are now protected, and only users with the right permissions can get to them.
In our drink dispenser analogy, the ordinary stockers can restock Coke and Fanta; members of the special Executive group can also remove Coke and Fanta, and interact with the Absolut Vodka as well. (You don't have executive-only vodka dispensers in your workplace? Hey, bad luck.)
To start defining security settings, go to the "Security" drop-down in the manager.
Users and user groups
You create users by clicking "Manage Users" in this drop-down. It's analogous to creating a new resource, although the interface looks quite different.
Confusingly, you create user groups by clicking "Access Controls" in the drop-down (this button might better be called "Manage Access").
When you set up user groups, you need to answer the fundamental security question - "what will these people be allowed to do?" In MODX, these are "permissions" - things like being able to view document, save a document, change a password or create a snippet. At time of writing there were 172 separate permissions. This is the sort of thing that makes MODX security look scary.
MODX's solution is to group the permissions together in what it calls "Access Policies", which are standardised bundles of permissions. (To make life easier, but also add yet another concept, MODX also supplies some boilerplate access policies called "Policy Templates".) You give each user group one or more particular access policies for each context. For instance, an ordinary website visitor gets to load resources in the web context, and do absolutely nothing in the mgr (manager) context.
Annoyingly, the default "Content Editor" policy shipped with MODX is extremely restrictive. If you're creating editors, you'll probably want to create a duplicate of the AdministratorTemplate called EditorAdministratorTemplate, assign that to a new "Editor Admin" access policy, and then start stripping back the permissions that EditorAdministratorTemplate gets. That's Bob Ray's recipe, and it seems to work best.
Resource groups
You define resource groups by clicking "Resource Groups" in the "Security" drop-down in the manager. This brings up an interface which allows you to drag-and-drop resources from the resource tree into particular resource groups. You can also assign a resource to a resource group by ticking a box on the "Resource Groups" tab in the resources editor, though this needs a bit of set-up.)
The Resource Groups option also gives you access to a big button called "Create Resource Group" which calls up a wizard for creating a resource group. This is the first fruit of the MODX team's effort to simplify MODX security. You can choose to give admin users instant access to your new resource group, and also to create a parallel user group with the same name. In practice, this isn't quite as useful as you'd think. If you have pages which you want only editors to see, creating an "Editors" resource group will create an "Editors" user group as well. But when you create a "publishers" user grooup with extra powers, you will have to remembers that the "Editors" resource group is now misleadingly titled, and is actually available to both editors and publishers. You'd be better off creating an "Internal Access" resource group, and giving both editors and publishers access to it.
Letting users create and edit their own pages
I'll just quote Bob Ray here: "If you want users to see only their own pages, you need a separate User Group and a separate Resource Group for each user (name both after the user to make things easier)." You cannot just associate a user with their dedicated resource group; instead you have to give the user their own user group and then associate that user group with the resource group. You'll also need to use that modified DefaultResourceGroup plug-in mentioned at the top of this article.
Roles
I've intentionally left any discussion of MODX user roles until last. Roles are really just names that get an "authority number". The authority number is what matters. Within a user group, a user with a stronger (i.e. lower) authority number inherits all the permissions of users with weaker or equal authority numbers.
To start with, when you're given a choice, you can usually set the role as "Member", with the weakest possible authority number - 9999. (Remember, lower numbers equal greater authority. Just think of authority numbers as a pecking order, where 10 is higher than 9999 and 0 is the highest of all.)
If and when you create user groups, roles start to become more important. In particular, users must be added to user groups with a role whose authority is high enough; the authority number set in the user group's "User" tab should not be lower than the authority number for the relevant "minimum role" in the user group's Context Access tab.
A checklist for manager user creation
- Create user groups: Set up user groups that will need to access internal pages. Typically these groups have names like "Editor" and "Senior editor".
- To do this, go to Security -> Access Controls and click the "New User Group" button.
- What powers do these users have? That's controlled by the access policy. Assign these user groups the pre-made "Content Editor" policy. (You may want to give them greater acess using a more powerful policy.)
- Note that the username and password you specified at setup time are for an administrative super-user with almost unlimited powers over the system. Your normal users should have more constrained powers.
- Add users to your user groups. By adding users to user groups, you give them power over content. Add users to the user groups where it makes sense for them to have particular levels of power (for instance, members of the "editor" group can edit stories).
- To do this, go to Security -> Manage Users and click the "New User" button.
- You can add a user to a user group by clicking the "Access Permissions" tab.
- Ensure that the new users:
- belong to a user group with an access policy that permits access to the "mgr" context; and
- are added to the group with a role whose authority number is high enough. The role's authority number should not be lower than the authority number for the relevant "minimum role" in the user group's context Access tab. The relevant minimum role, in this case, is the one with the access policy you want. Getting this wrong can cause a heap of problems, including users being unable to log in (he said, shuddering at the memory).
An editor example
Let's try an example for creating an editor user (with thanks to MODX forum user jusmeig):
- Create an "Editor" user group.
- Create an "Editor user" role with an authority number of 100.
- Create a new user.
- Add the new user to the "Editor" user group with the role of "Editor user".
- Update the user group by adding these settings in the "Context Access" tab on the User group update screen - this screen is accessed by selecting a user group in the "Access Controls" screen, right-clicking and selecting "Update". (Yes, this definitely eeds simplification.) The settings you want to set are :
- Context: mgr | Minimum Role: Editor | Access Policy: Content Editor (ensures this user can login to manager)
- Context: web | Minimum Role: Editor | Access Policy: Content Editor
Controlling what users see in the manager
What resources users see in the manager is controlled by a Modx access control list or ACL. But many other settings are controlled elsewhere.
- The visibility of the element tab and files tab in the site tree depend on specific user permissions.
- The visibility of items in the top manager is set in a separate panel.
- The visibility of fields in the main resource panel depends on specific form customisations.
A checklist for protecting resources
- Create a resource group: Your first step is to set up a resource group with a name like "internalAccess" or "staff Access" and add the admin user to it. This lets you have a bunch of private pages you can use for notes, instructions and the like. You'll only be able to see them when you're logged in, and you'll log in through the manager.
- To do this, go to Security -> Resource Groups and click the "Create Resource Group" button
- Add resources to resource groups: By adding resources to resource groups, you enabled the resources to be managed simply but with power. Add resources to your new resource group ("internalAccess" or the like) so that only that user group is able to use them.
- To do this, go to Security -> Resource Groups and drag resources into resource groups.
- You can also assign resources to resource groups when you're creating or editing the resources. Go to the resource you want to assign, and click the "Resource Groups" tab.
- Resources that aren't in any resource group will by default be available to the public once they're published.
Create pages
Creating a new Modx page is simple: just right-click on any folder or page resource in the Resources tree on the left-hand side of the Modx manager screen, and mouse over to the "Create" option. Then click on "Create a Document Here":
If you have installed the Articles add-on, you can create "Articles" through the Articles interface. These articles won't show up in your resource tree, and they can be configured very easily to use comments, pagination, tagging and so on. This is ideal if your site will have a stream of blog posts, news articles or similar.
Instead of going into your resource tree, Articles go into "Articles Containers". Creating an Articles Container is simple: just right-click on any folder or page resource in the Resources tree on the left-hand side of the Modx manager screen, and mouse over to the "Create" option. Then click on "Create Articles Here":
This will load a screen to create a Articles Container that can contain any number of articles (blog posts) you want.
The Articles themselves are pretty much just ordinary Modx resources, which is to say they are ordinary web pages. The one exception is that because they are invisible to the resources tree, you will have to set getResources calls to "showHidden=1" if you want Articles to show up in listings and the like.
If you use Articles, then you can customise the appearance using template chunks.
Organise your resources
I recommend you create a directory straight away for resources you want to be available to the system but not seen by Google, within site searches etc. This will make it easier for you to specify which resources these are - e.g. "everything within my 'unindexed' directory".
Within this directory I recommend you create a sub-directory for pages you do not want published, for the same reason.
This structure pays off in all sorts of ways as you go about building your site.
As an example, you can then use getResources to write a chunk listing the pages that you want SimpleSearch not to search through:
[ [!getResources? &parents=`[index number of my unindexed folder]` &tpl=`tplExcludedFromSearch` &showHidden=`1` &showUnpublished=`1` &limit=`0` &sortby=`id`] ]
The tplExcludedFromSearch chunk, in its entirety:
[ [+id] ],
Sundries
A host of small details need to be taken care of.
Icons
You'll need icons for browsers (favicons), operating systems, phones and tablets. Follow these steps:
- Create a master icon graphic in Photoshop or similar at 144x144 pixels and save it as a PSD.
- Duplicate the master icon graphic and save it as "apple-touch-icon-144x144.png". This will create a high-quality icon on iPads.
- Duplicate the master icon graphic again, resize it to 114x114 pixels, and save it as "apple-touch-icon-114x114.png". This will create a high-quality icon on iPhones; it will be automatically resized to 57x57 on pre-Retina iPhones.
- Duplicate the master icon graphic again, resize it to 96x96 pixels, and save it as "apple-touch-icon-precomposed.png". This will create a generic icon without Apple's standard effects, which all versions of Android will also recognise (Android only recognises files without "precomposed" from Android 2.1 on).
- Duplicate the master icon graphic again, resize it to 64x64 pixels, and save it as "favicon.ico". (You can install a file to provide Photoshop ICO format support.) Then edit it using the xicon online editor. This will create a generic icon for Windows.
- Duplicate the master icon graphic yet again, resize it to 16x16 pixels, and save it as "favicon-root.ico". This will create a small browser icon.
The small favicon file should go into your web server root and be renamed as favicon.ico. Some versions of Internet Explorer will look use this. Put the other files in the assets directory (the following setup uses /assets/images/icons/) and reference them as follows:
<link rel="shortcut icon" type="image/x-icon" href="favicon.ico"/>
<link rel="shortcut icon" type="image/x-icon" href="/assets/images/icons/favicon.ico"/>
<link href="/assets/images/icons/apple-touch-icon-precomposed.png" rel="apple-touch-icon" />
<link href="/assets/images/icons/apple-touch-icon-144x144.png" rel="apple-touch-icon" sizes="144x144" />
<link href="/assets/images/icons/apple-touch-icon-114x114.png" rel="apple-touch-icon" sizes="114x114" />
Icons are listed largest first, so that iOS versions prior to version 4.2 (which doesn’t support the sizes attribute) gets the correct icon.
If you want to create your own rounded corners, drop shadows and reflections to your iPhone icons, use the "precomposed" command:
rel="apple-touch-icon-precomposed"
Sitemap
Use the GoogleSitemap add-on to create a sitemap and point Google at it. Remember to make sure your sitemap uses an empty template and the XML content type.
Robots.txt
If you have organised your files as suggested above, you can now implement a simple and automatic robots.txt solution to guide search engines through your site.
- Create a new document called "robots" with content type "text". You now have a robots.txt file.
- Inside the document, put the code below:
User-agent: *
Disallow: /manager/
Disallow: /[ [~666] ]
Sitemap: http://mysite.com[ [~11] ]
... where 666 is the id of your "not indexed" directory (and 11 is the id of your sitemap, if you have one).
You can also remove the /manager/ line if you have moved your manager directory out of the site root.
You now have one directory that most search engines won't index, no matter what you call it or where you put it.
Error page
MODX defaults to sending missing page requests - technically, 404 errors - to the home page, which usually bears id number 1. You can do better. Create a page that helps search engines users, following Jakob Nielsen's principles. Note its document id number. Then go to the manager's navigation bar and select System -> System Settings. In the search box, type in error_page. That will bring up the required item. Click on the field where it says "1" and change it to the id of your new error page.
Terms of use and privacy
Dull, but important – explain what your site is doing, what behaviour you expect and what you will do with information you receive from users. Reda this useful guide to terms of use.
You can set out your privacy policy here, but it is better put on a separate page.
Contact page
MODX uses a dynamic form system called FormIt, which has a terrific contact form example here. Read this useful guide to contact form design.
Search page
Follow the SimpleSearch documentation to extract best results from this powerful add-on.
- You can specify the directories you want to search with the ids property. Use e.g. "&ids=`323,456,2,45`" in your Simple Search call.
- You can do the opposite and specify resources you want to exclude. To specify directories you want to exclude, you need to write a chunk as described above. (Hopefully this will be built into SimpleSearch soon.)
- You can set up a "faceted search" that will search all your users and return the one searched for in a profile page. See the faceted Simple Search documentation.
- You can manipulate the string returned when there are no results. See the forum discussion.
- Particular rules apply to Articles:
- To search articles, you must include the setting "&hideMenu=`1`" in your SimpleSearch call.
- If you have published articles in an unpublished Article Container, the articles will show up in SimpleSearch results. Use e.g. "&exclude=`42, 112,113`" in your Simple Search call to exclude them.
Redirects
If the new site is replacing an old one at another domain, you'll need to set up 301 redirects at the old site that point to the appropriate pages in the new site. Use Xenu's Link Sleuth or something similar to crawl the old site, dump the resulting list of pages into a spreadsheet, and map each one to its new equivalent, then turn it into an addition to the .htaccess file. That way Google will treat your new site as essentially a continuation of the old site, which it knows and likes. While you're at it, ensure your Google Webmaster Tools account can see the old site and report what's happening to traffic there.
If you don't control the old site, you'll need to ask the person who does to do all this for you.
Set up social feeds and search engine tools
MODX makes RSS feeds simple. See Bob Ray's RSS feed tutorial or the official MODX version. The Articles add-on has an automatic RSS feed, but not everyone can get it to work.
The Articles add-on also has the facility to feed material into Twitter, but it's limited and unreliable. You're better off creating RSS feeds and then pushing material from them into Facebook, Twitter, LinkedIn and everywhere else using posting services such as Twitterfeed (free at time of writing), dlvr.it (free, but paid versions also post to Google+), or IFTTT ("if this then that" - free but limited at time of writing). For Facebook only, RSS Graffiti is attracting good word-of-mouth (actually, good word-of-post in the MODX forums) and has a free version at time of writing. But TwitterFeed is free, fairly powerful, has integrated statistis and bit.ly integration, and generally does the job well - as long as you don't need to publish to Google+.
An alternative is to use Bob Ray's Notify extra. It's particularly suitable if you don't want to tweet all your Articles (or all of your pages) but a sub-set that you select. It also gives you additional control over wording and lets you post to Facebook.
Set up your users
Figure out what your users are doing most and give them simple ways to do it. The Dashboard - the first thing they see when they log into MODX - is your best chance to make them happy users. So spend time configuring it:
- Follow Christian Seel's instructions to create quick-start Dashboard buttons for common tasks such as a new entry in a particular site area using a particular template, or editing an often-revised resource. MODX does not enable such tasks out of the box; a well-designed Dashboard lets you correct that oversight.
- Set up Sterc's Google Analytics Dashboard widget so that users can see their Google stats from inside MODX. Make sure to add the required entries in System Settings; if necessary check the Configuring Google Analytics Dashboard Widget forum thread.
- Get rid of the MODX news feed and security feed; your users don't want to see them and won't know what to do with them.
- Elevate the list of recently-edited resources, which provides shortcuts to recent work.
Make sure they're comfortable with how the system works. Some ideas:
- Supply users with a tailored manual based on Shorewalker.com's Modx end-user manual – which as far as I know is the most comprehensive and adaptable end-user manual for MODX Revolution.
- Let users explore on a demo installation where they can't "break" anything.
- Once they have been exposed to the system, talk to them about the tasks they need to perform. Stress your openness to hearing and resolving any concerns they may have. You don't have much choice in this: if they have complaints but won't air them in front of you, they'll air them once you've left, eroding confidence in the system you've just built.
Make it wonderful
The site's set up. That's not the end; it's the beginning.